
Devices
Devices
The Devices page (/devices) is your complete inventory of all NeST hardware associated with your account. Use it to inspect device details, configure network settings, set up WiFi, and verify scoreboard connections.
Physical Setup
IT / Installer: This section covers first-time hardware setup. If your NeST is already installed and online, skip ahead to The Devices Table.
Your NeST box contains the NeST device, a power adapter, and connection cables.
Warning: Use only the included 5VDC, 2.5-amp power adapter. Using the wrong adapter damages internal components and is not covered under warranty. Replacement cost is $150.
Connect in this order:
- Connect the Ethernet cable to the NeST and to your network switch.
- Wait until the Ethernet link light is active.
- Connect the power adapter.
The NeST must have an active Ethernet connection before WiFi can be configured. Do not skip to WiFi during initial installation — connect via Ethernet first, configure WiFi through the app, then disconnect the Ethernet cable if a permanent wire run is not practical.
Network Requirements
IT / Installer: Your network must allow outbound traffic on the following ports and to the following domains for the NeST to communicate with ScoreBird services.
Required Ports
| Port | Protocol | Purpose |
|---|---|---|
| 53 | UDP | DNS |
| 80 | TCP | HTTP software updates |
| 443 | TCP | HTTPS — all encrypted communications |
Domain Whitelist
If your network uses hostname-based filtering, allow the following domains:
Core device services
iotcore.imtdesign.biza2u9gya9azl3fe.iot.us-east-1.amazonaws.com
System updates
ports.ubuntu.comapt.armbian.comapt.fury.io
MAC Address Filtering
If your network restricts access by MAC address, add the NeST's MAC address to the allowlist. The MAC address is visible in the device detail view under the Details tab.
IP Whitelisting
Note: Do not use IP address whitelisting to control NeST access. ScoreBird services run on cloud providers, including AWS, where IP addresses change without notice. Use hostname/domain whitelisting instead.
Cellular
The NeST has a built-in cellular modem. Use cellular only as a last-resort backup — cellular data is unreliable in sporting arenas and should never be your primary connection.
The Devices Table
Navigate to Devices in the main menu to see all NeST units in a sortable, searchable table.
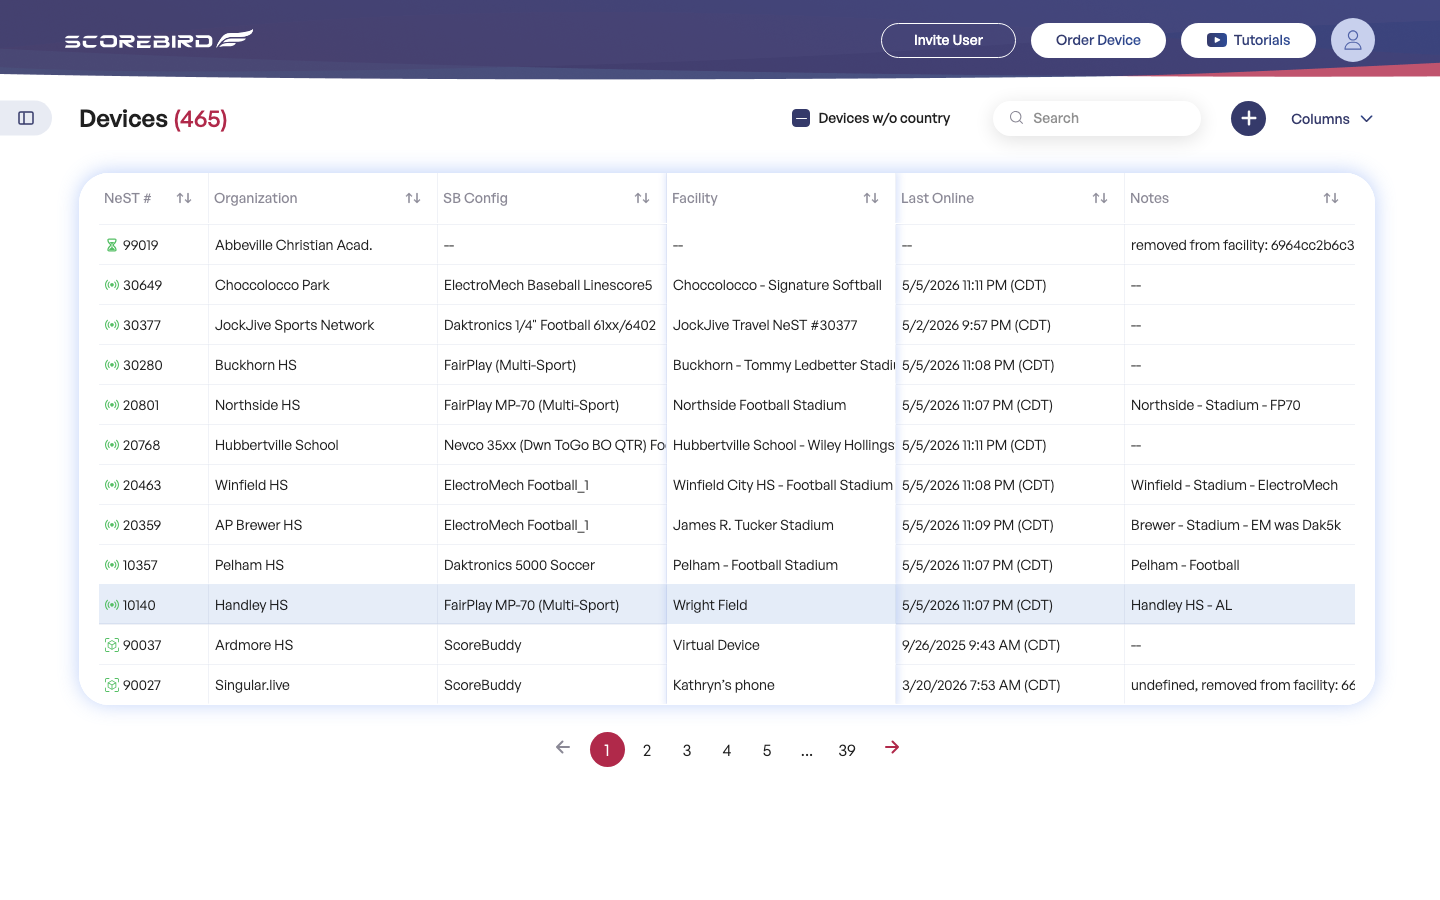
Table Columns
| Column | Description |
|---|---|
| NeST # | The device serial number. Click to open the device detail view. |
| Organization | The organization that owns the device. |
| Tx | Transmission type indicator. |
| NB Coding | Internal coding reference used during provisioning. |
| Facility | The venue where the device is physically installed. |
| Address / Location | Physical address or location notes for the facility. |
| Date | The date associated with the device's last recorded event. |
| Time (EDT) | The time of the last recorded event, shown in Eastern Daylight Time. |
| Notes | Free-form notes added during setup or by support staff. |
Sorting
Click any column header to sort the table by that column. An arrow (↑ or ↓) indicates the current sort direction. Click the same header again to reverse the sort order.
Searching
Use the Search bar in the top-right corner of the table to filter rows by any text value — serial number, facility name, organization, or notes. The table updates as you type.
Pagination
Large accounts may have hundreds of devices. Use the pagination controls at the bottom of the table to move between pages. The total device count is displayed alongside the page controls.
Device Details
Click any row in the Devices table to open the detail view for that device.
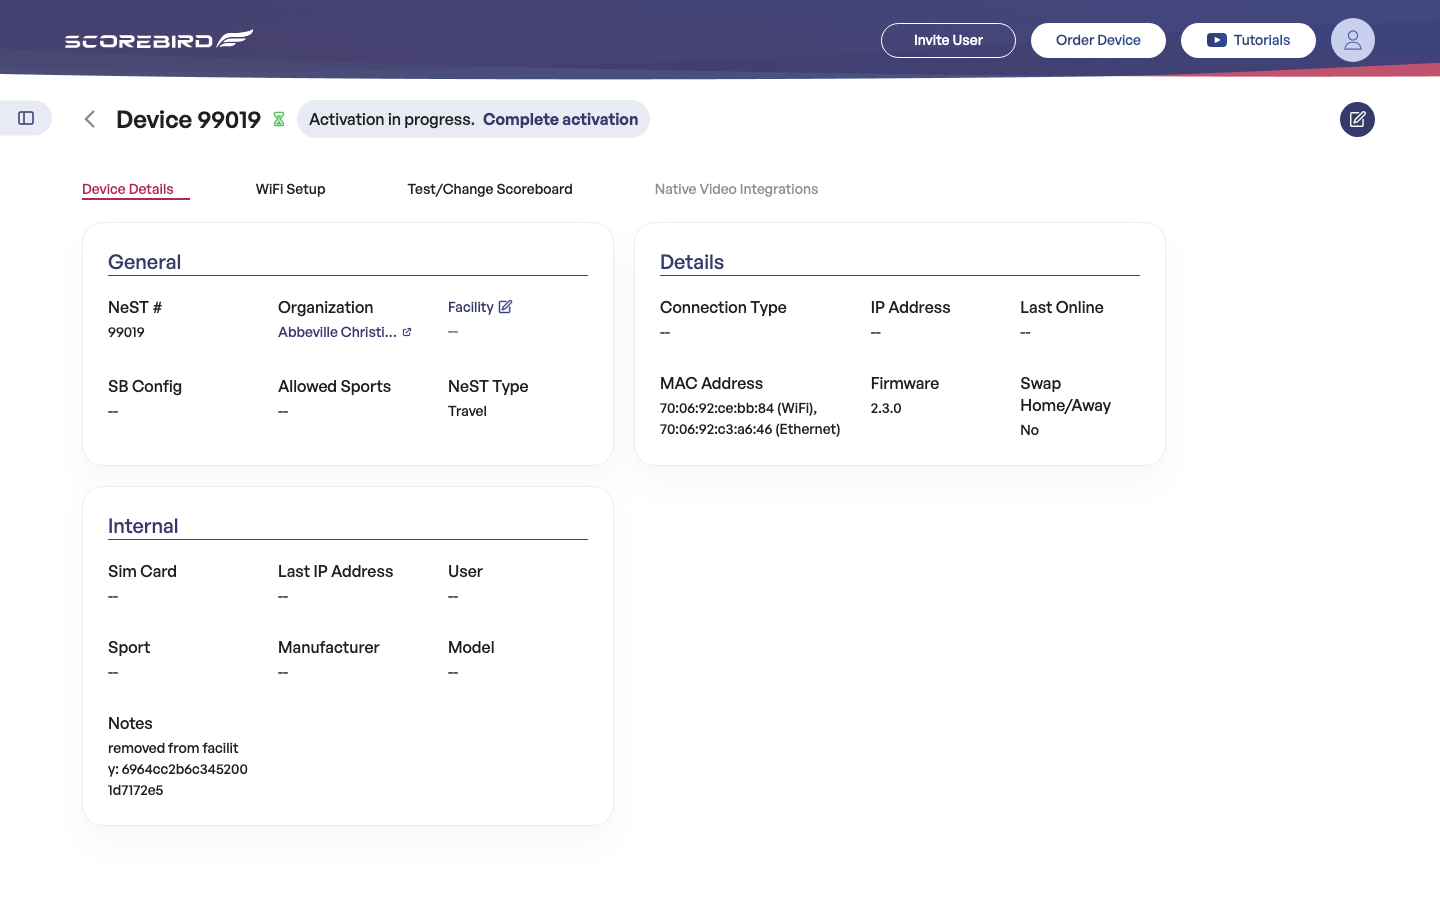
The detail view is organized into three sections:
General
| Field | Description |
|---|---|
| NeST # | The device serial number. |
| Organization | The organization that owns this device. |
| Facility | The venue this device is assigned to. |
| Allowed Sports | Sports this device is configured to detect. |
| NeST Type | Subscription type: Facility, Campus, or Travel. |
| SB Config | The scoreboard make and model the device is configured to read. |
Details
| Field | Description |
|---|---|
| Connection Type | Ethernet, WiFi, or Cellular. |
| IP Address | Current IP address of the device on the local network. |
| Last Online | Date and time the device last communicated with ScoreBird. |
| MAC Address | Hardware MAC addresses for WiFi and Ethernet interfaces. |
| Firmware | Current firmware version installed on the device. |
| Swap Home/Away | When enabled, reverses the home and away score outputs. |
Internal (visible to Admins and Super Admins)
| Field | Description |
|---|---|
| Sim Card | Cellular SIM card identifier, if equipped. |
| Last IP Address | Last known IP address. |
| User | The account user associated with this device. |
| Sport / Manufacturer / Model | Internal configuration references. |
| Notes | Free-form notes from setup or support. |
Tabs
The detail view includes three tabs for device configuration:
Device Details — General info, network details, and internal hardware fields (MAC address, firmware version, SIM card, etc.). This is the default view.
WiFi Setup — Connect the device to a wireless network. See Setting Up WiFi below.
Test/Change Scoreboard — Select the scoreboard manufacturer and model, and send a test signal to verify the connection. See Testing Your Scoreboard Connection below.
Native Video Integrations — Configure native video output settings and integrations for this device.
Editing a Device
Click Edit in the device detail view to modify the device name, facility assignment, or other configuration fields. Save your changes when done — updates take effect immediately.
Setting Up WiFi
WiFi is the recommended connection type when a permanent Ethernet run is not practical. Before you begin, confirm that the NeST device is powered on and has an active internet connection via Ethernet (required for the initial configuration push).
- Open the device detail view by clicking the device row in the Devices table.
- Click the WiFi Setup tab.
- The device scans for wireless networks in range. Available networks appear in a list.
- Select your network from the list.
- Enter the WiFi password in the field provided.
- Click Connect.
- Wait up to 60 seconds for the device to associate with the network. When the connection succeeds, Status updates to Online and the Connected field changes to WiFi.
Tip: If your network does not appear in the scan results, confirm the device is within range of the access point. Hidden SSIDs are not shown; contact support@scorebird.com for manual configuration options.
Testing Your Scoreboard Connection
Before a game, confirm that the NeST device can communicate with your physical scoreboard.
- Open the device detail view.
- Click the Test/Change Scoreboard tab.
- Select your scoreboard manufacturer from the dropdown.
- Select the specific model from the second dropdown. The model list updates automatically when you change the manufacturer.
- Click Test. The device sends a test signal to the scoreboard.
- Observe the physical scoreboard to confirm it responds correctly (displays test data or acknowledges the signal).
- If the scoreboard does not respond, verify the cable connection between the NeST output port and the scoreboard controller, then repeat the test.
Tip: If you are switching from one scoreboard manufacturer to another at the same facility, use this tab to update the configuration before the next game. The change takes effect immediately.
Supported Scoreboard Manufacturers
The NeST is compatible with scoreboards from the following manufacturers:
NEVCO, Fair-Play, Daktronics, Electro-Mech, All American, OES, Spectrum-Watchfire, Varsity, PC Scoreboards, ScoreVision, ESA, Kazo Vision
If your scoreboard manufacturer is not listed, contact support@scorebird.com — compatibility is added regularly and the support team can confirm whether your model is supported.
Completing Device Activation
Devices that are powered on but have not been fully configured appear with a Complete activation badge on the Game Day screen and in the Devices table.
Activation requires assigning the device to a facility and confirming the sport configuration.
- Open the device detail view by clicking the device row in the Devices table.
- Click Edit.
- In the Facility field, select or create the venue where the device is installed.
- Select the primary Sport the device will be used for.
- Confirm the SB Config (scoreboard make and model) is correct, or update it using the Test/Change Scoreboard tab.
- Click Save.
Once all required fields are complete, the Complete activation badge is removed and the device is ready to score games.
IT / Installer: This section is relevant during initial hardware setup. If you are deploying multiple devices at once, complete activation for each device before handing off to the coaching or operations staff.
Device Status Reference
Online — device is connected and streaming
The device is connected to the internet and streaming scoreboard data. No action needed.
Offline — device cannot be reached
The device cannot be reached by ScoreBird servers. Check the network connection at the facility. If the connection appears healthy, try the Reboot button on the Game Day screen or the device detail view. If the device remains offline after 90 seconds, contact support@scorebird.com.
Complete activation — setup is incomplete
The device is powered on but has not been assigned to a facility or had its sport configured. Follow the steps in Completing Device Activation above.
Virtual NeST
The Virtual NeST gives you the same capabilities as a physical NeST device without requiring traditional scoreboard hardware — useful when you want to schedule games, use HTML5 broadcast overlays, or access native integrations at a facility that does not have a supported physical scoreboard.
- What it replaces: the physical NeST hardware connection to a scoreboard controller.
- What it provides: all ScoreBird platform features — game scheduling, broadcast overlays, and native video integrations.
- Availability: subscription-based add-on, available on both iOS and Android.
- How to get it: contact sales@scorebird.com or call 844-GOT-BIRD (844-468-2473) for pricing and provisioning.
Still need help?
Can't find what you're looking for? Our support team is here to help.
Contact Support →Ready to automate your scores?
NeST connects to your scoreboard and powers everything you just read about.