
Schedules
Schedules
Schedules are the bridge between your games and your NeST devices. Each schedule record associates a specific game — teams, date, time, sport, and venue — with the NeST device at that facility. Without a schedule, the NeST has no context for whose scores it is sending, so overlays and virtual scoreboards cannot display team names, logos, or game metadata.
Navigate to Schedules in the left sidebar to manage all of your organization's upcoming and past games.
The Schedules List
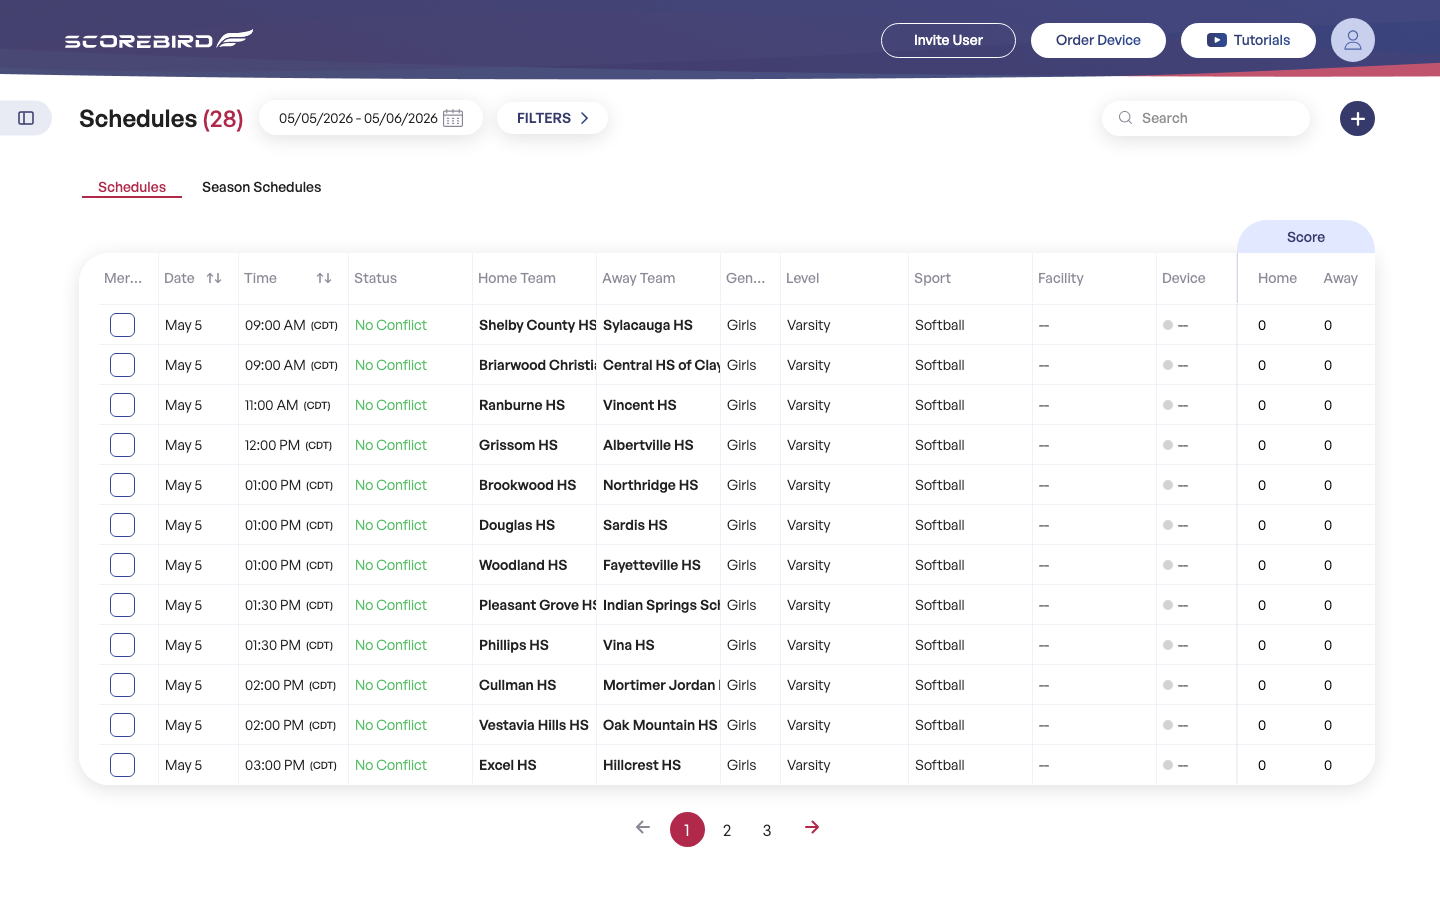
The Schedules screen opens to the Schedules tab showing every game scheduled within the current date range. The page title — Schedules (N) — shows how many schedules fall within that range.
Date Range
The date range picker at the top-left defaults to today. Click it to enter a custom range in MM/DD/YYYY format and browse past or future game days. All counts and table rows update to reflect your selection.
Filters
Click the FILTERS button to expand the filter panel. Use filters to narrow the list by sport, team, gender, level, facility, or device. Filters stack — you can combine them to isolate exactly the games you need. Click FILTERS again to collapse the panel when you are done.
Use the Search bar at the top-right to find a specific game by team name, opponent, facility, or any other text in the table.
Schedule Table Columns
Mer... (Merge) — Merge status indicator. See Merging Schedules.
Date — Date of the game.
Time — Scheduled start time.
Status — Current state of the game (Scheduled, In Progress, Final).
Home Team / Away Team — Team names for the home and away sides.
Gen (Gender) — Gender designation for the game (Boys, Girls, Men, Women, Co-Ed).
Level — Competitive level (Varsity, JV, Middle School, etc.).
Sport — The sport being played.
Facility — The venue where the game is taking place.
Device — The NeST serial number assigned to score this game.
Home / Away (Score) — Current or final score for each side.
Note: A loading skeleton appears in place of rows while the table is fetching data. If you see the skeleton for more than a few seconds, check your internet connection or try refreshing the page.
Creating a Schedule
You can create a schedule from the Schedules screen or directly from a device card on the Game Day screen. Either path opens the Add Schedule modal.
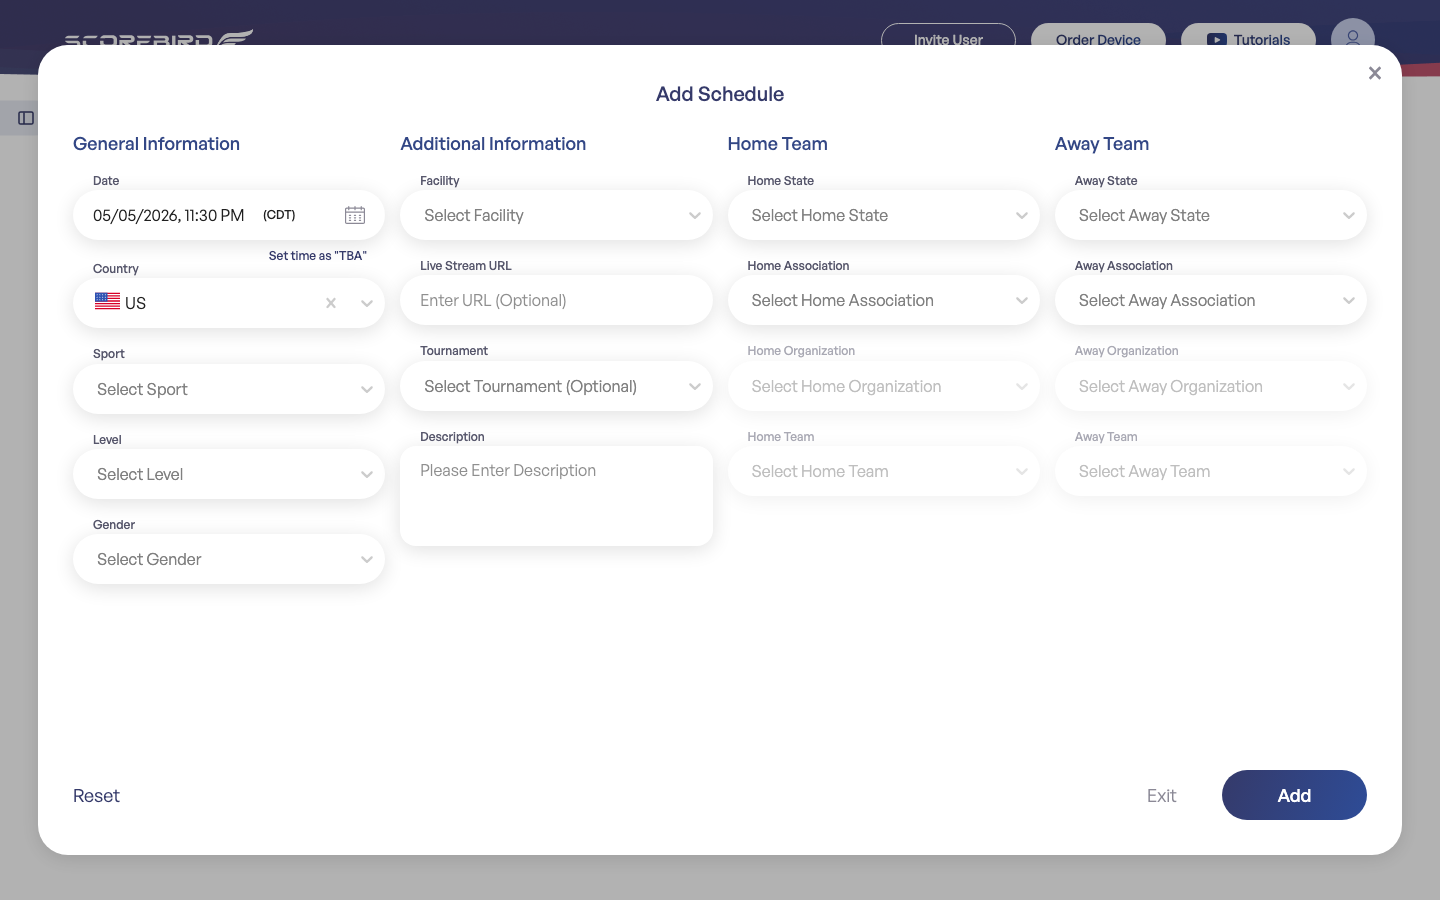
The form is divided into four columns:
- Click the blue + button at the top-right of the Schedules screen.
- In General Information, fill in:
- Date — click the calendar icon to pick a date and time. Click Set time as "TBA" to leave the time unconfirmed.
- Country — defaults to US.
- Sport — select the sport being played.
- Level — Varsity, JV, Middle School, etc.
- Gender — Boys, Girls, Men, Women, or Co-Ed.
- In Additional Information, fill in:
- Facility — select the venue. The NeST device assigned to that facility links automatically.
- Live Stream URL — (optional) paste a stream link to associate with the game record.
- Tournament — (optional) link this game to an existing tournament.
- Description — (optional) any notes about the game.
- In Home Team, select:
- Home State → Home Association → Home Organization → Home Team (each dropdown narrows based on the previous selection).
- In Away Team, select the same hierarchy for the visiting team.
- Click Add to save. The schedule appears in the table immediately.
Tip: If the Facility dropdown does not show the venue you need, it has not been configured yet. Go to Facilities in the left sidebar to add it and assign a NeST device before creating the schedule.
Tip: If a team does not appear in the Home Team or Away Team dropdowns, make sure it has been created under the correct organization in the Teams section.
Season Schedules
The Season Schedules tab groups an entire season of games under a single record. Instead of creating individual games one by one, a season schedule lets you import or bulk-manage a team's complete schedule and reference it from one place.
Creating a Season Schedule
- Click the Season Schedules tab at the top of the page.
- Click the blue + button.
- Select the Team.
- Enter the Season name or year (e.g. "2025-2026 Varsity Basketball").
- Set the season Start Date and End Date to define the date range that encompasses all games.
- Click Save.
Assigning Games to a Season Schedule
Once a season schedule exists, individual game schedules can be linked to it:
- Open the game schedule you want to assign (click its row to expand details).
- In the schedule details panel, locate the Season Schedule field.
- Select the season schedule from the dropdown.
- Save the change. The game now appears under that season schedule's record.
Tip: Use season schedules when importing or bulk-managing a team's full schedule.
Editing and Deleting Schedules
Editing a Schedule
- Click any row in the schedule table to expand its detail panel.
- Click the pencil (edit) icon to open the schedule form with all fields editable.
- Update any field — team, opponent, date, time, facility, home/away, or notes.
- Click Save to apply your changes.
Deleting a Schedule
- Expand the schedule row by clicking it.
- Click the trash (delete) icon.
- Confirm the deletion when prompted.
Note: Deleting a schedule removes its live scoring history. Past scores associated with the schedule will no longer be accessible. This action cannot be undone.
Merging Schedules
The Mer... (Merge) column in the schedule table shows whether a schedule has been merged with a duplicate from another source. Merging is used when the same game is imported from multiple systems — for example, when a school's athletic management software and ScoreBird both create a record for the same game.
Why Merges Happen
ScoreBird may automatically detect that two schedule records represent the same game based on matching team names, date, time, and facility. When a potential duplicate is detected, the merge icon on the row activates.
Initiating a Merge
- Locate the schedule row showing the merge indicator in the Mer... column.
- Click the merge icon on that row.
- Review the duplicate records shown in the merge dialog — confirm which details are correct for each field.
- Confirm the merge. ScoreBird combines the two records into one, preserving the most complete data from both sources.
Note: Merged schedules retain the live scoring history from both source records.
Scoring a Live Game
The Schedules screen gives you quick access to live scoring without navigating away from your schedule list.
Opening the Score Modal
- Click the Score button at the top-right of the schedule table to open a scoring session for the most relevant active game.
- Alternatively, click the score cells (the Home or Away score columns) on any individual row to open the score modal for that specific game.
Using the Score Modal
The score modal displays the current home and away scores with increment and decrement controls.
- Tap + to add a point to a team's score.
- Tap − to subtract a point.
- All changes broadcast instantly — overlays and virtual scoreboards update in real time the moment you change a value.
When the game ends, close the modal. The final score is saved automatically to the schedule record and remains visible in the schedule table and game history.
Tip: You can also score games directly from the Game Day dashboard. Both paths open the same scoring modal and sync to the same NeST device output.
Still need help?
Can't find what you're looking for? Our support team is here to help.
Contact Support →Ready to automate your scores?
NeST connects to your scoreboard and powers everything you just read about.